New wireless setup
This post describes setting up client-specific wireless network keys (private pre-shared keys or “PPSKs”) and per-client VLAN settings on a single wireless SSID, using FreeRADIUS to provide the key and vlan information.
In 2020, I reintroduced VLANs to segment out network, which were removed due to not traversing the power-line network I had in 2018. When I deployed my new wireless access points (WAPs), at the same time, I created an SSID for each VLAN as that was the simplest and most obvious way to connect devices to the appropriate segment.
Over the past couple of months, I have been testing setting up PPSK with FreeRADIUS and yesterday flipped our main SSID over to it and migrated all of the clients (either reconfiguring keys and/or changing SSIDs). It went so smoothly I even deleted all of the other SSIDs and, in an unexpected pleasant twist, turned off an old WAP, now 10 years old, that had been kept for 2 devices (central heating thermostat and a cheap ‘doggie’ camera) that didn’t support long wireless keys. The old setup is perhaps best summarised in my recent post describing replacing the core switch.
TP-Link have a surprisingly good PPSK Configuration Guide, which covers both their product and the necessary FreeRADIUS configuration.
FreeRADIUS
The TP-Link EAP225 WAPs I have, and their Omada control software, can be easily configured to use a RADIUS server and take client VLAN assignments from it. So, the first piece of this particular puzzle is a RADIUS server for which I setup FreeRADIUS.
Step one was to install FreeRADIUS. I installed it on my command-and-control server, where SaltStack and the Omada software are also hosted, for now. Without --no-install-recommends this installs a lot of dependencies (all via the recommended collectd package) including java which I did not want to add to my server unnecessarily:
apt-get install --no-install-recommends freeradius freeradius-utils
Next I need to setup the client in FreeRADIUS. I did this in /etc/freeradius/3.0/clients.conf, leaving the default localhostand localhost_v6 clients for testing. Once configured in Omada, the access point connect directly to FreeRADIUS so I allowed connectivity from the entire management network, although I could have just listed the access points individually here. The other setting is the shared secret, which will also need configuring in the Omada software and is how FreeRADIUS authenticates the client before allowing to try and authenticate, in this case, a wireless connection.
client tplink_eaps {
  ipaddr = 192.168.10.0/24 # EAP management network
  secret = some_shared_secret # Shared secret
}
Finally, because I am using the default “files” backend, I added my clients to the /etc/freeradius/3.0/mods-config/files/authorizefile. The WAPs send the connecting client’s media access control (MAC) address as both username and password to the Radius server. The format of the MAC address is now configurable (see Configuring the wireless network below) on the Omada software, I opted to keep the existing lower-case and colon separated format that was fixed before. The FreeRADIUS server responds with the clients personal key in the Tunnel-password option and the VLAN for the client in the Tunnel-Private-Group-id option (as well as other settings to establish this is a VLAN-enabled response). The DEFAULT option at the end matches all other clients, and permits access to the guest VLAN with the guest PSK:
# Laurence's phone
xx:xx:xx:xx:xx:xx Cleartext-Password := "xx:xx:xx:xx:xx:xx"
        Tunnel-password = "test_key1",
        Tunnel-Type = "VLAN",
        Tunnel-Medium-Type = "IEEE-802",
        Tunnel-Private-Group-Id = "20",
        Reply-Message = "Hello, %u"

# Laurence's tablet
yy:yy:yy:yy:yy:yy Cleartext-Password := "yy:yy:yy:yy:yy:yy"
        Tunnel-password = "test_key2",
        Tunnel-Type = "VLAN",
        Tunnel-Medium-Type = "IEEE-802",
        Tunnel-Private-Group-Id = "20",
        Reply-Message = "Hello, %u"

# Laurence's laptop
zz:zz:zz:zz:zz:zz Cleartext-Password := "zz:zz:zz:zz:zz:zz"
        Tunnel-password = "test_key3",
        Tunnel-Type = "VLAN",
        Tunnel-Medium-Type = "IEEE-802",
        Tunnel-Private-Group-Id = "20",
        Reply-Message = "Hello, %u"

# Unrecognised MAC addresses are permitted access to the guest network
# with the correct PSK.
DEFAULT Auth-Type:= Accept
        Tunnel-password = "guest_key",
        Tunnel-Type = "VLAN",
        Tunnel-Medium-Type = "IEEE-802",
        Tunnel-Private-Group-Id = "40",
        Reply-Message = "Hello, %u"
To activate the new configuration, I restarted the FreeRADIUS service:
systemctl restart freeradius
On my network, all of this was done with the SaltStack configuration management system. The client portion of the configuration I added to the pillar data (along with the localhost and localhost_v6 clients), using Salt’s dictionary merging behaviour to separate the wireless-specific client from the generic localhost clients allowing them to be applied separately or together to a system. This will make it trivial to add other clients in future (it’s just another key to merge in the freeradius:clients dictionary), e.g. if I want to add 802.1X on the wired network.
For the wireless clients, I just added wireless_key and wireless_vlan (although I may want to revisit the naming of this in the future, if I roll out 802.1X) to the existing hosts data for my network, also in the pillar data - creating new entries for devices (mainly internet-of-things type devices) that were previously not listed.
Configuring the wireless network
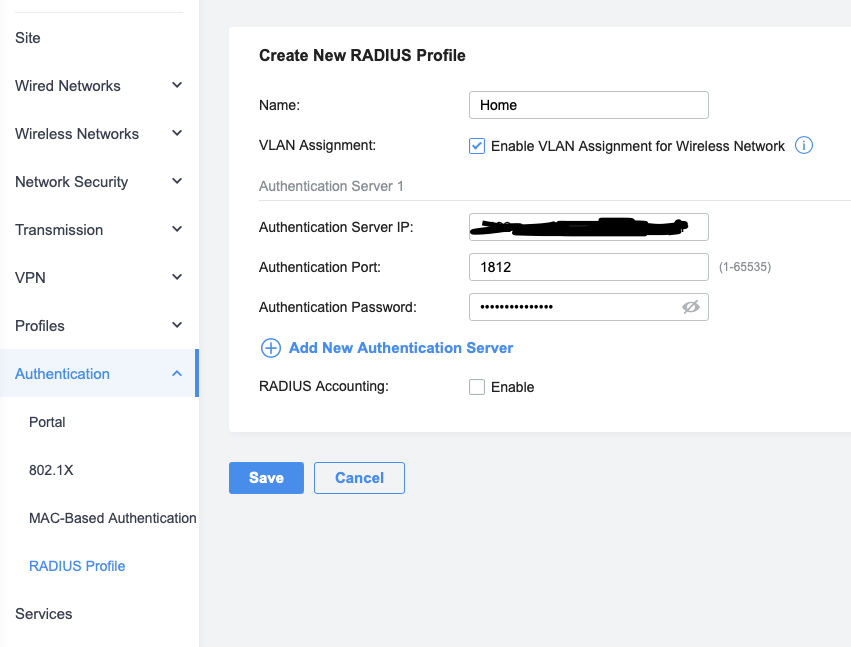
This was also straight-forward, although it also has 2 steps. First, one needs to add the RADIUS profile for the FreeRADIUS server. There’s a specific tick-box to tick to enable setting wireless VLAN assignment from it, the Authentication Password should be set to the shared secret from FreeRADIUS’ client configuration and I left accounting disabled for now:
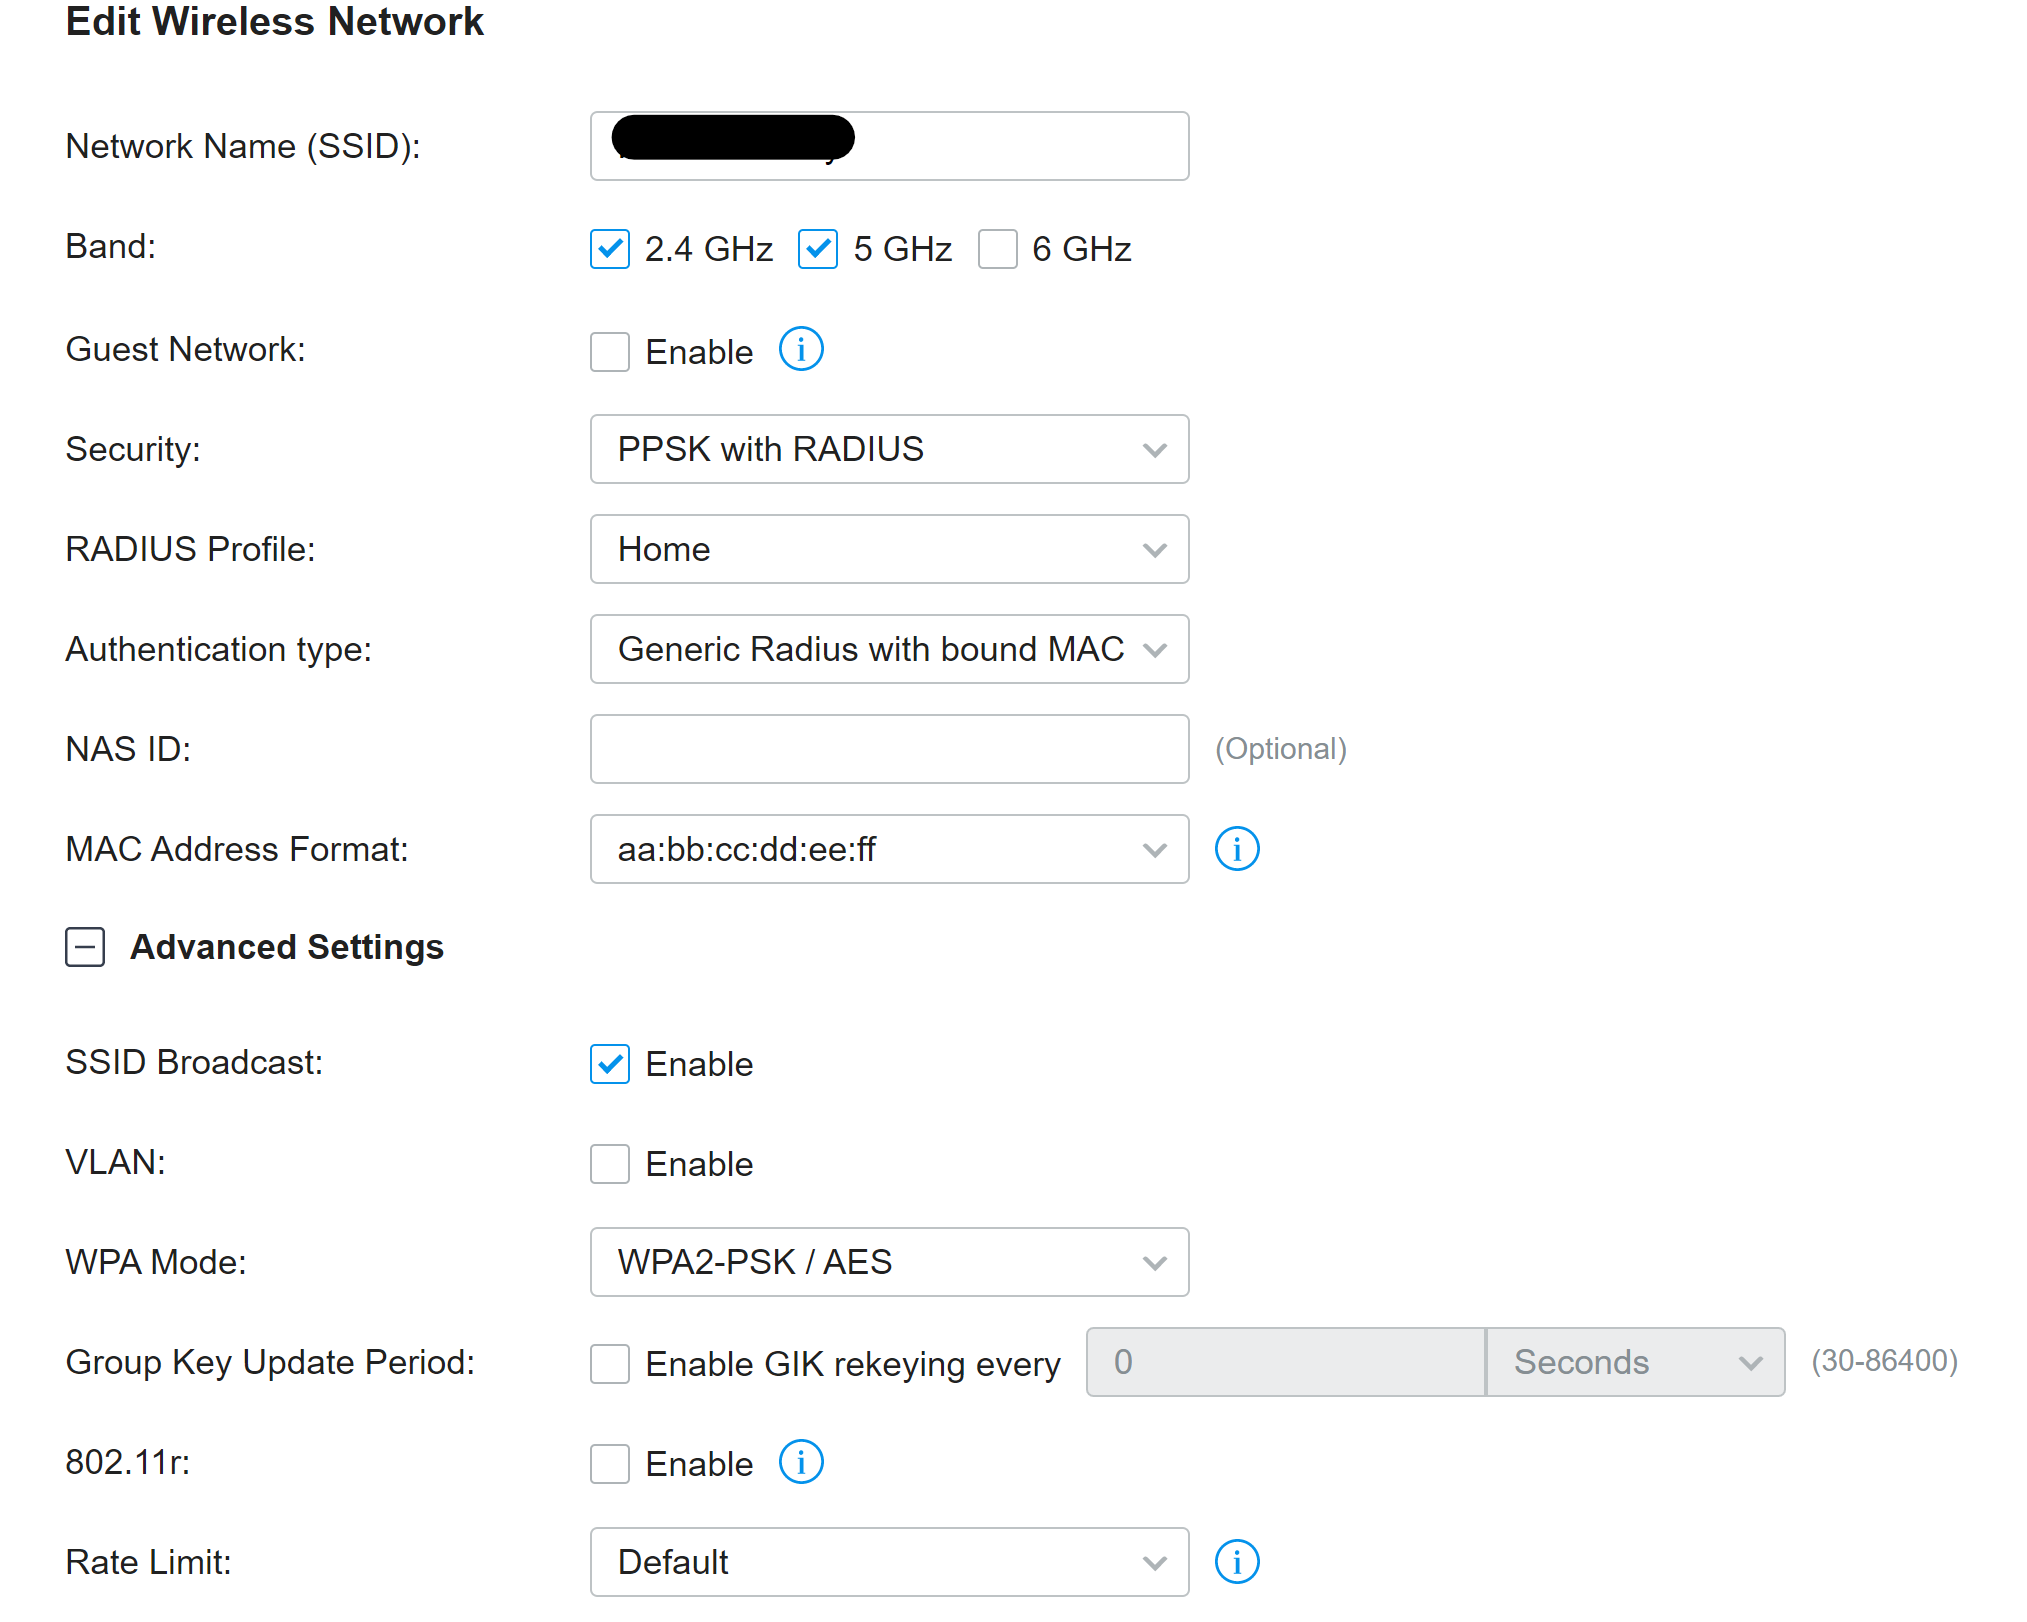
Once configured, the security for the wireless network can be set to PPSK with RADIUS, the RADIUS profile created above chosen and any other settings set. I disabled 802.11r on the live network, due to the older client compatibility health-warning in the interface, and did not set a default VLAN (as all clients will be given a VLAN by RADIUS):
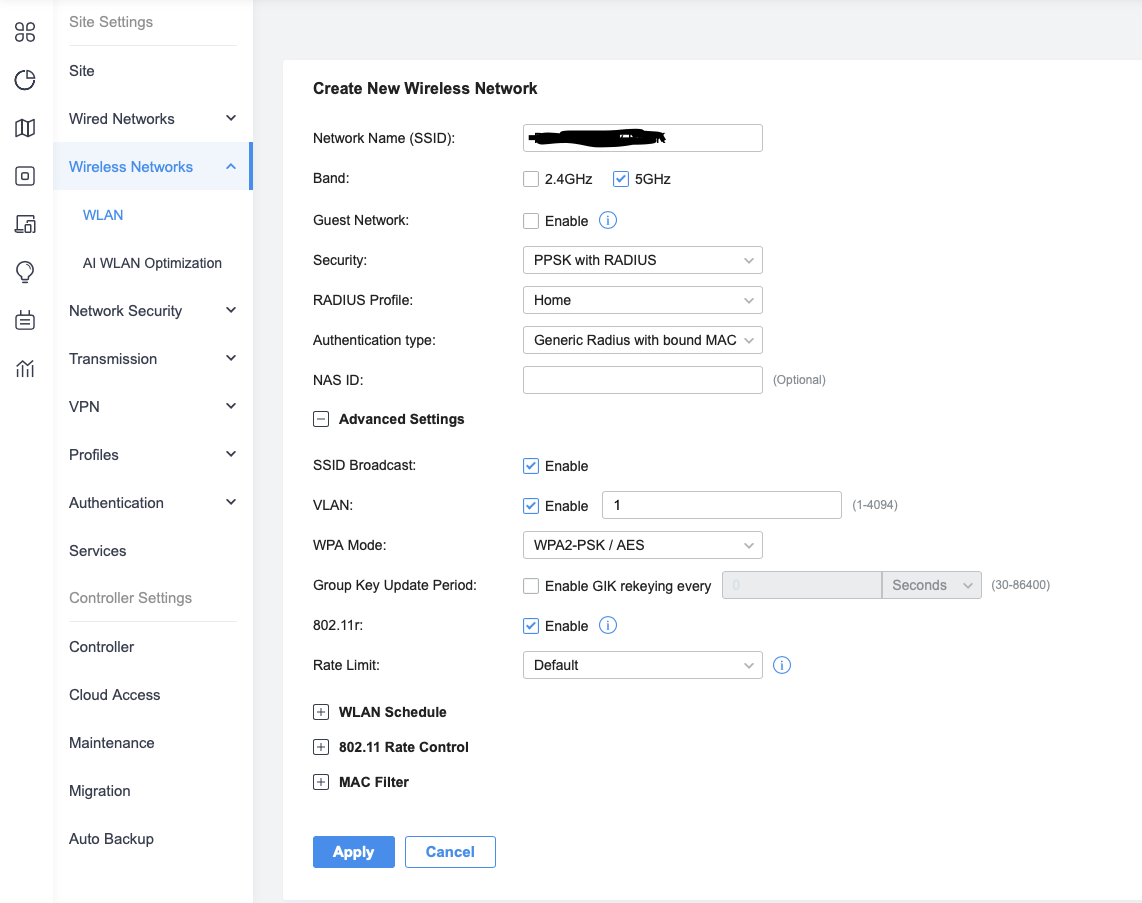
This seems to be an area of rapid development, as there are a number of changes to the UI - relevant to RADIUS the MAC format box - from my screenshot of the test wireless settings from the end of August (only 1 month ago):
Finally, as the WAPs connect directly to the RADIUS server, I needed to allow that connectivity between the VLANs in my firewall:
# Allow access to the freeradius server (for WAPs)
iptables -A mgmt-fw -i $NET_MGMT -o $NET_MAIN -p udp -d $radius_server --dport 1812 -m state --state NEW -j ACCEPT # FreeRadius
Once configured, this was one of those very pleasant experiences where everything “just worked” as expected - clients with new keys (or on the old “internet of things”, “central heating” or “CCTV” wireless networks) had to be reconfigured but I encountered no problems at all. Even the problematic central heating thermostat and our wireless “doogie camera”, which had previously refused to work on the internet of things network, connected fine once I gave them a shorter key to use.
For the existing wireless networks on the Omada system, I simply deleted them one-by-one.
Removing the old WAP
As the central heating and dodgy doggie camera were now on the main wireless, the old Asus router I had been using for their WAP could finally be retired.
After switching off and unplugging it, I restored the switch port it had been plugged into to default settings:
core-switch(config)#interface gigabitEthernet 1/0/45
core-switch(config-if)#no description
core-switch(config-if)#switchport pvid 1
core-switch(config-if)#no switchport general allowed vlan 30
core-switch(config-if)#switchport general allowed vlan 1 untagged
core-switch(config-if)#exit
Not forgetting to save the changes:
core-switch#copy running-config startup-config
Future developments
I did a lot here, and (touch wood) in the 3 days it has taken me to write this all up it has been completely reliable. As with all major changes, I want to let the dust settle and be confident everything is working as it should before I try to make any more changes. There are a number of things I would like to explore further though:
-
Radius accounting, which I left turned off, however this may tie into a wider question of how I collect, manager and review logs/accounting/audit data (short version: I don’t currently).
-
My yaml data for the hosts on my network has grown considerably and I think it has reached the point that a database would be more sensible. Coupled with this, I should look at whether I want to use a database or some sort of directory service (i.e. LDAP) for FreeRADIUS’ authentication information - flat files I have used are intended to be a temporaray solution to get going with this.
-
FreeRADIUS has its own DHCP server which, amongst other things, can give out IP addresses based on authentication credentials - allowing ‘follow-me’ IP addressing, even if the device in use changes. I want to investigate this and look into if this can be made to work with multiple devices when using user (rather than device - e.g. 802.1X with username/password auth on the wired network) authentication with a per-user pool of IP addresses.
-
Following on from the DHCP thought, I now have a list of all wireless client’s MAC addresses. At present, I have static IP addresses set for a lot of them which the DHCP server is configured to give out based on MAC address and the DNS for each client is separately configured in the DNS server. Would could be interesting is letting the DHCP server hand out all IP addresses dynamically and then update the DNS based on mapping the MAC to the device (a mapping now created for everything wireless). This eliminates the pre-configuring and reserving of IP addresses entirely, making IP addressing entirely dynamic but also allows controlling the updating of DNS to a trusted system (the DHCP server) rather than trusting clients to dynamically update DNS directly.